Painting Wallpaper to Look Like Patinaed Gold

Sometimes I paint specialty finishes that look like wallpaper – but on a recent project, I actually painted on wallpaper for a specialty finish!

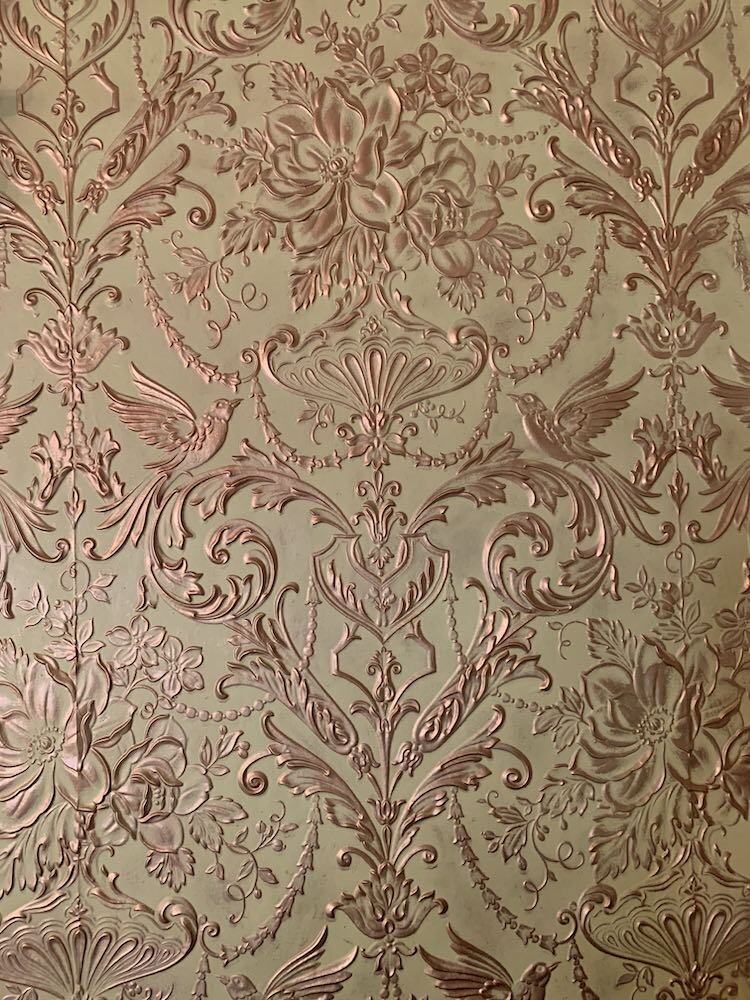
This was not your standard wallpaper, however.  Made by Lincrusta, this wallpaper is embossed – creating a three-dimensional pattern that looks like decorative plaster.

My client Cathy had the vision to enhance the Lincrusta paper in her dining room by painting it green and then having gold paint applied to the raised surfaces to create the effect of embossed gold that had aged with a greenish patina and had the raised surfaces burnished by years of wear.  I loved this idea and was excited to collaborate with Cathy when she called me in to help make this vision come to life!

As always, the first step was to create a test board to make sure I was getting the look Cathy wanted before painting the walls.  In this case, Cathy had done tests on her own and already had a good start on the best technique for the desired effect!  I took a scrap of the paper back to the studio and worked up a sample to show how I could make this work across the room.

When I returned with the test, Cathy and I collaborated further and I was on to the wall.  One lesson I have learned over the years is to always start on the most inconspicuous part of a room – which I did in Cathy’s dining room to get her final approval on the look for the rest of the space.  With the thumbs up on my first section – I was on to transforming the rest of the room.

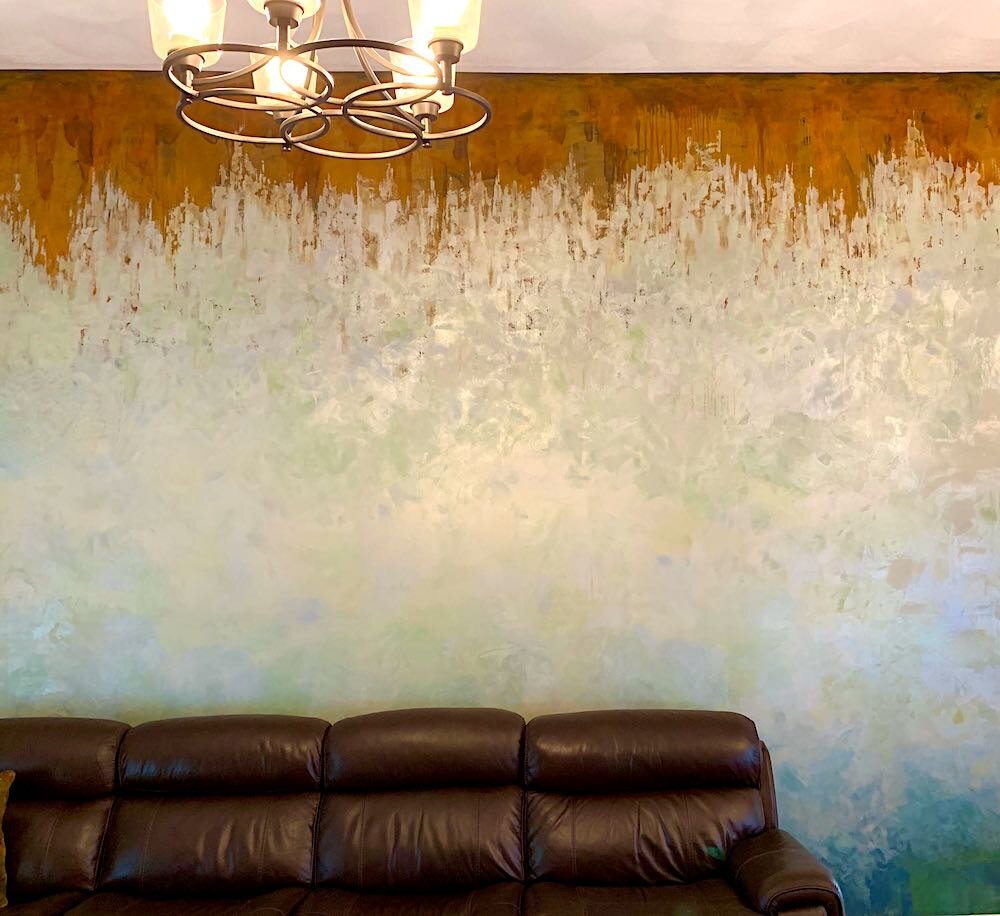
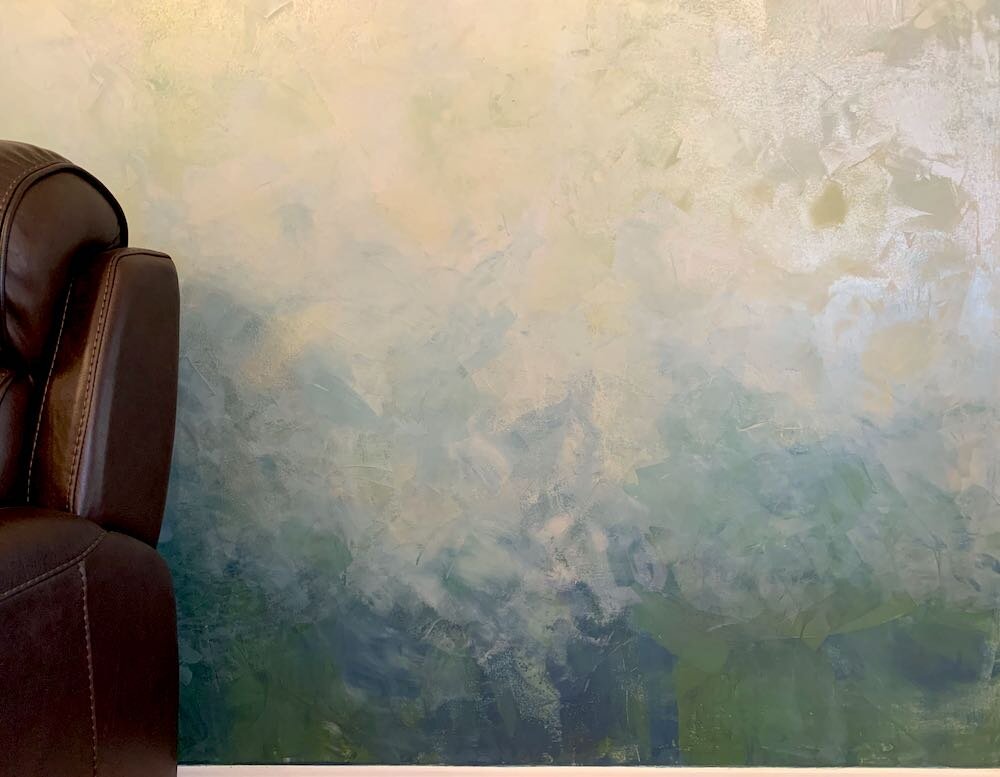
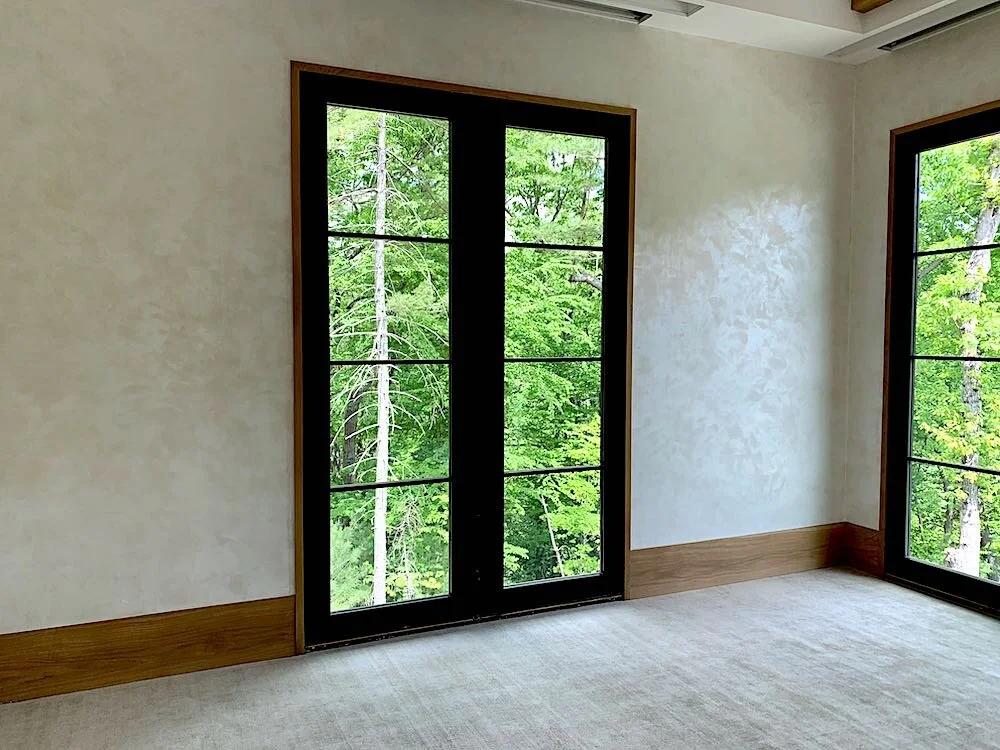
It was extremely gratifying to have accomplished exactly the look Cathy was going for – and to help her create an amazing space!

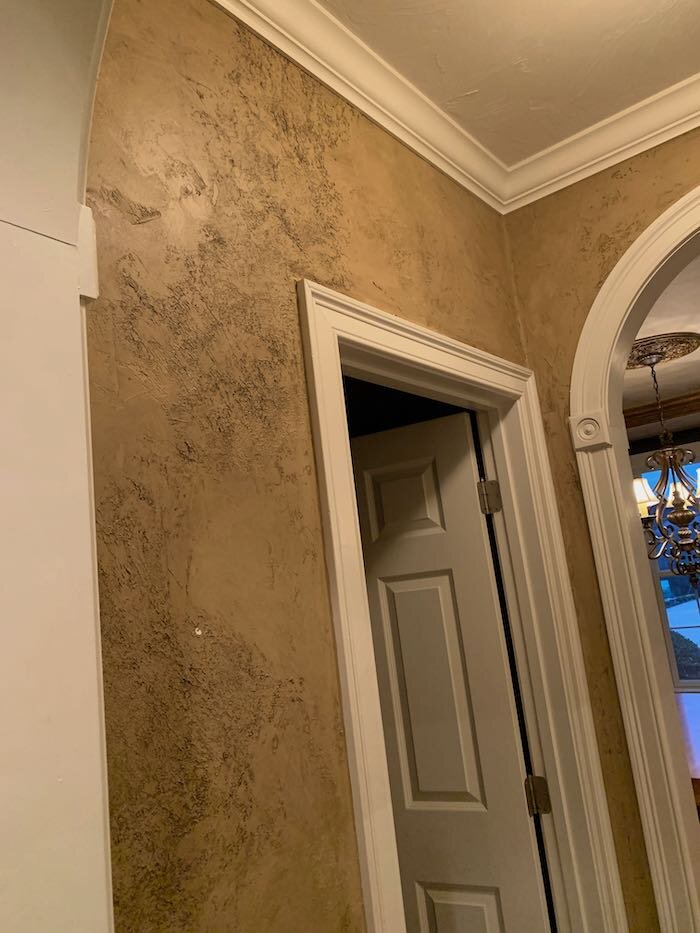
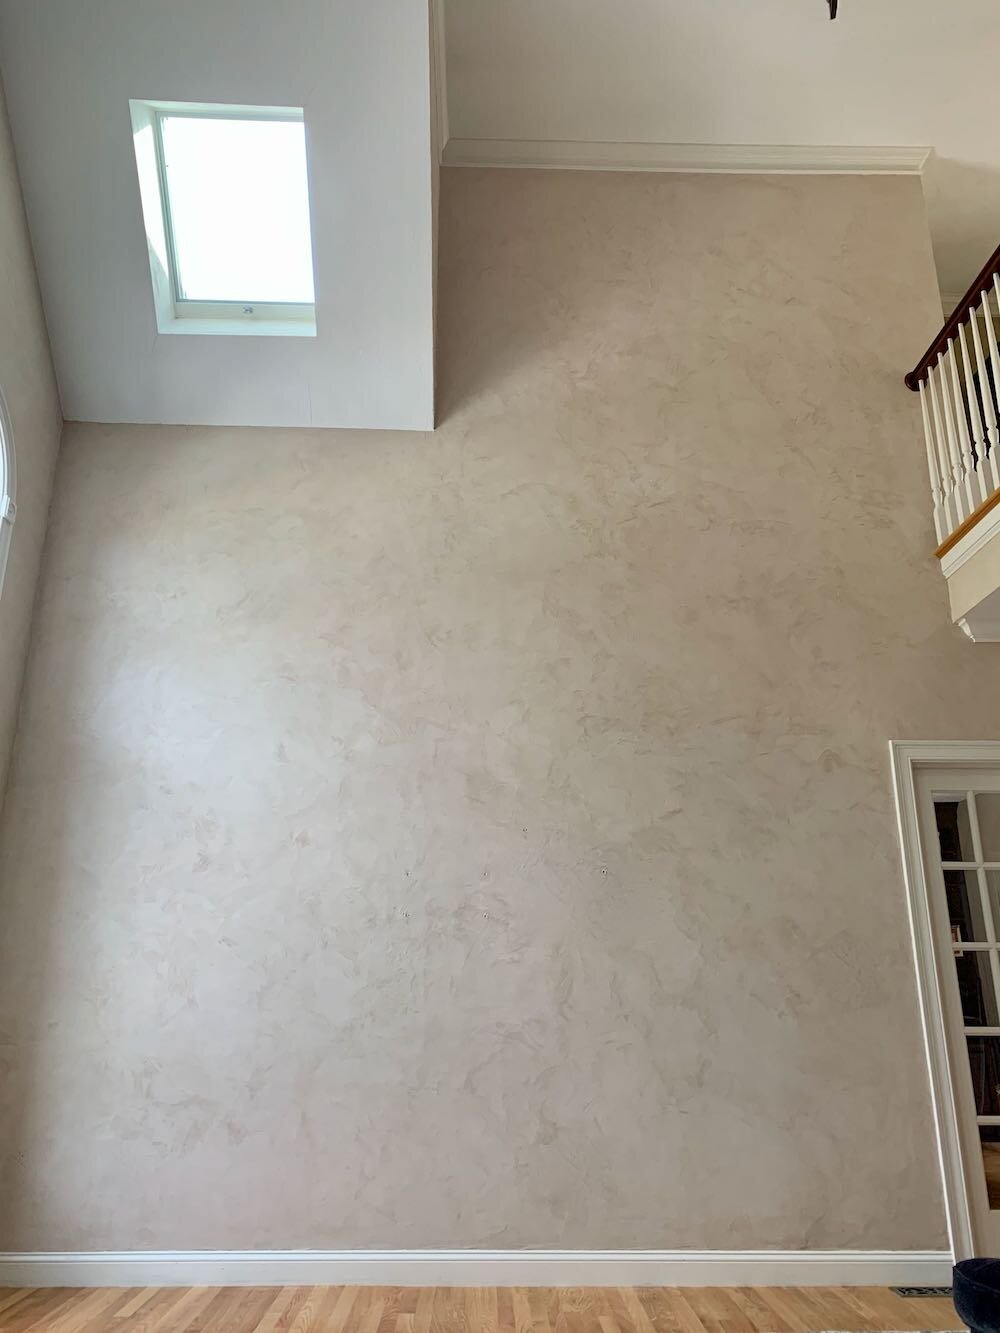
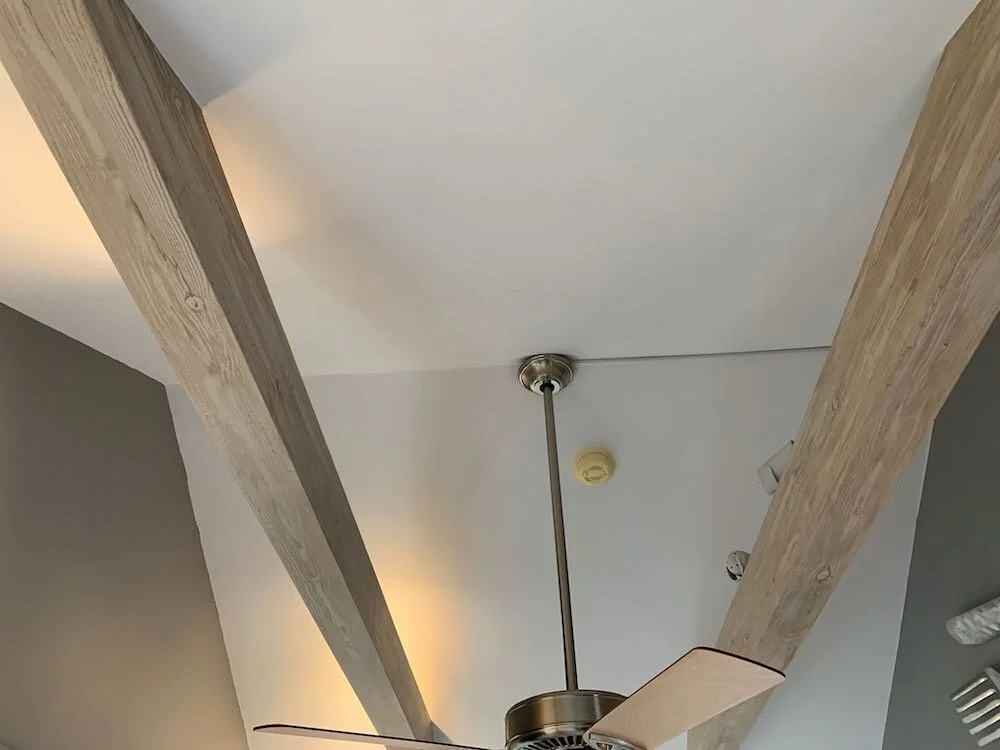
Below are some pictures of the final result

Enjoy!

Jason

gold on lincrusta 1 BLOG.jpeg
gold on lincrusta 2 BLOG.jpeg
gold on lincrusta 4 BLOG.jpeg
gold on lincrusta 3 BLOG.jpeg

Sneak Peek of the Winchester Library Murals!

I just finished my weeks-long project at the Winchester Library Children’s Room!  It is not open to the public yet, so at this point we are only releasing a few sneak-peek pictures of the 20 mural vignettes throughout the room.

 The Children’s Room has a whimsical nature theme - with animals, birds, insects, twisty tree and giant flowers throughout the space.

 There will be more to come soon!

 Enjoy!

Jason

Winchester butterfly final (1).jpeg
Winchester deer final.jpeg
Winchester flowers final.jpeg
Winchester tree and groundhog final.jpeg

Sneak peek!!!

It has been fantastic working with the Wellesley Library team again on another project!  This one is in the main library branch and includes 8 murals ranging in size from 9’ high by 4’ wide all the way up to 6’ high by 25’ wide.  I am working with an origami theme for all of the murals and have been fortunate to partner with the Origamido team and using their designs as my subjects.  The opening is planned for October and the reveal will be a surprise – but this one small origami detail is being sneaked as a teaser for the many critters (and more!) that are underway.  More to come in October!!


Enjoy!

Jason

sqirrel teaser.jpeg

Now That’s a Statement Wall!

Many of my clients want subtlety… subtle beauty, subtle interest, etc… But not this recent client!!

I partnered with my colleague Joan on this project in Bedford, MA – where the goal was to do something bold and different.  Our client Jack was interested in samples we showed him using rust (yes, rust!) and metallic plaster.  He liked the idea of fading one into the other, as well as a fade with the plaster colors – so we were on to creating his bold statement wall.

The rust is an amazing product.  You first paint an iron-infused base coat and then apply an acid activator that creates actual rust.  This gives all the natural variation of real rust with the flexibility to apply it wherever you want it.  We started with this at the top and let it drip down a couple of feet from the ceiling. 

For the metallic plaster, Jack and his wife liked greens and wanted us to create an ombre effect – fading up from darker, more saturated greens to lighter colors and ultimately up to the rust.

It was fun to do something this bold!  It was also fun to get Jack’s text when the job was done – saying “it’s soooo cool. I love it!”


Enjoy!

Jason

rust and plaster wall blog.jpeg
Close up of plaster ombre

Close up of plaster ombre

Close up of fade into rust

Close up of fade into rust

Completing the Grandeur of this Master Bedroom with Metallic Plaster

Sometimes I am called in from the beginning of a design process to collaborate on finishes, and other times, I am called in as a “fix”!

On a recent project – the “fix” started with understanding the original goals.  The challenge was created by a high-gloss wallpaper that unfortunately was flawed, and needed to be taken down as soon as they started installing it.  The project was a new-construction house that was near completion and suddenly the master bedroom became an obstacle to reaching the finish line!

The original goal of the designer and client was to add to the special feeling of this grand master bedroom with the pop of the high-gloss paper.  With that option off the table, the designer called me, and we were back to the drawing board.  To come up with a solution, we started with the goal of making the finish feel special and looked at options I could create.  After considering various specialty products and techniques, we settled on the metallic plaster - which has a rich, velvety textured look that also has a beautiful shine.  Working with the tones in the carpet, we chose plaster colors in white, creamy off-white and slightly grayish off-white that I combined to create slight variations in color in addition to the variations in shine and texture.

And it was a success!  In the end, the client liked the metallic plaster even better than  the look that the wallpaper was supposed to create!


Enjoy!

Jason

metallic plaster blog.jpeg
Close-up showing texture and shine!

Close-up showing texture and shine!

Lime Paint Adds “Wow” Factor to Bathroom

I recently got a call from my interior design friends at Briar Design to collaborate on a specialty finish for the master bath on a project of theirs.

The clients are from Ireland and have an affinity for the old-world look of the aged plaster in Ireland, but also like a clean, more contemporary look.  The wife, Sheri, is also a big fan of color – so we needed something that would work with the adjacent spaces without being too neutral. Most importantly, the finish needed to be interesting and give the bathroom a “wow” factor.

I brought some samples of different finishes in different colors to look at in the space together with Briar and Sheri, and my lime paint sample immediately stood out.  The subtle, natural variation added just enough character to give the interest they were looking for, while still not looking too fussy with the rest of the clean décor.

For the color, we chose this soft grayish green which gave just the right look in combination with the spaces around it.

With the finish chosen – I was on to creating the look!  Lime paint is a multi-stage project that requires a base coat, troweled second coat and then a wax finish to seal it.  The wax finish gives the end result a beautiful soft glow that also has subtle variation (because it is also trowel-applied).

The completed look was a hit!  It was exactly what the designer and client were looking for.

Below is a picture of the final result, with a close-up to show the shine of the finish.


Enjoy!

Jason

lime paint bathroom blog copy.jpg
Close-up showing the soft glow of the wax finish

Close-up showing the soft glow of the wax finish

Hand-Painted “Wallpaper” Elevates Ceiling!

Creating custom design solutions is a big part of what I do – and this recent ceiling project is a great example.  I was working with one of my interior designer partners, whose client had chosen a wallpaper for her entry hall closet and powder room – and wanted a treatment on the ceiling that would “elevate” the space to a whole new level!

The wallpaper chosen was ornate, but with a bit of an eclectic twist to it that went with the décor throughout the house.  Our challenge for the ceiling was to keep with the ornate theme without making the overall effect too busy.  The designer knew she wanted a painted “wallpaper” look, and it was up to me to create the design.

Working with a sample of the paper, I first chose a palette that built off the cream tones in the wallpaper, using the apricot colors as the accent.  Because green was the dominant color of the paper, I chose not to emphasize this in my pattern.  For the design, I wanted to use some of the smaller elements from the paper so my design did not complete with the walls – so I picked up on the flower buds and the feeling of motion in the wallpaper.  As usual, my first step was to create a sample board to share with the designer and client.  They loved where I I was going with the design, so I was on to painting the ceilings!

The concept board

The concept board

Using my design as a guide, I drew and painted the design on the ceilings – starting with the closet hallway.  When I had completed all of it minus the green accents, I found that I liked it more without any green in the ceiling at all.  After collaborating with the designer – we decided to leave it without the green and I was off to painting the second ceiling.

The end result accomplished exactly the look the homeowner and designer were looking for!

Both ceilings

Both ceilings

Close-up of bath ceiling

Close-up of bath ceiling

The hall ceiling (light fixture still to come!)

The hall ceiling (light fixture still to come!)

Enjoy!

-Jason

Hand painted Polka Dot Bathroom in Boston

It is always great to work with a repeat customer – which was the case with this hand-painted polka-dot bathroom!  Previously, I had painted a faux whitewashed brick wall for my client Nancy, so when she was ready to do something special in her bathroom, she gave me a call.

Nancy knew she wanted the polka dot look, but she didn’t like the idea of using wallpaper in her master bathroom.  She also wanted to be able to choose whatever color she wanted – so she had the idea to have me paint the polka dots using her choice of base color!

After collaborating on the size and spacing of the dots, I was on to the planning stage.  To make the spacing consistent, I made a couple of templates in advance and made a custom “stamps” for the ½” dots.

Once I was onsite and had the base color painted, it was on the plotting out the hundreds of individually painted dots.  I used my templates to space them 4” apart, staggering the rows by 2”.  The tricky parts were balancing the dots on the wall from top to bottom and left to right --- but also plotting the rows as they went around corners and obstacles like the vanity, mirror and toilet!

With a little bit of patience, I got it all to work for this fun bathroom finish!


Enjoy!

Jason

Nancy bath 1 BLOG.jpeg
Nancy bath 2 BLOG.jpeg
Nancy bath 3 BLOG.jpeg

Specialty Plaster Creates an “Ethereal” Ceiling

For a recent project in Weston, MA, my client Andrea called looking for a specialty treatment for the ceiling of her formal dining room.  The room houses a number of beautiful paintings and is used regularly by the family – so Andrea wanted something to make the room feel more special, and for the ceiling to fit better with the overall feeling of the room.

As we discussed ideas for the ceiling, Andrea described that she wanted something “ethereal”.  The solution needed to feel contemporary and impactful, but not too fussy.  She had looked at tea paper and considered silver leaf – but neither gave her the look she was going for. 

After seeing the space, we recommended a specialty metallic plaster.  The plaster is reflective, which would create interesting – and indeed ethereal – effects with lighting.  The application also creates a feel of motion, which creates the interest Andrea was looking for without feeling too structured or fussy.  Finally, the plaster could be mixed to create a color that would tie together the gray walls with some of the warmer and browner tones in the room.

With these notes in hand, we put together sample boards showing different colors of the metallic plaster so we could hold them up and see how they would feel in the space.  Andrea and her husband found an option they felt would be ideal -- so I was off to creating the final look!

After applying the plaster to the ceiling, Andrea was thrilled that we had created just the look she was going for!  Below are a couple of pictures of the final product.


Enjoy!

Jason

Andrea ceiling 1 BLOG.jpeg
Andrea ceiling 2 BLOG.jpeg

Abstract Mural Panels for Contemporary Home

I had the opportunity to do some decorative painting projects at a beautiful new contemporary home that is being built in Weston, MA – one of which is this series of abstract mural panels!

The panels are positioned in a large seating/gathering area that is adjacent to a bar in the lower level of the home.  To create a focal point in the room that is appropriate for the scale of the space, the designer had the idea to use these panels – each of which is 3.5 wide by 7 feet tall.  For the subject matter, the designer wanted something modern to go with the contemporary style of the home and the client’s taste.  Specifically, she had a wallpaper she wanted to use for inspiration, and had me design something similar that would fit the panels and have colors that would go with the furniture that will be placed in the space.

For my process, I first created scale concept paintings of each board – showing exactly how the larger version would appear.  With these approved, I was on to painting the large panels – which were a hit with the designer and the homeowner!

Below are pictures of all 4 of panels together - followed by each panel individually.

Enjoy!

Jason

Ash panels 4 final BLOG.jpeg
Panel 1 final BLOG.jpeg
panel 2 final BLOG.jpeg
Panel 3 final BLOG.jpeg
panel 4 final BLOG.jpeg

Gold Leaf Ceiling

Nothing brings interest, shine and richness to a room like gold leaf!  This ceiling in Weston, MA is done in imitation leaf – which looks a great deal like real leaf (it’s made from brass and other metals instead of real gold) without the expense of real gold.

The walls and cabinets of the space are dark charcoal gray (almost black), so the designer wanted to bring some glow into the room with the ceiling treatment – which we definitely did!

Gold leaf (and imitation leaf) comes in 51/2” square sheets that are super-thin (think thinner than tissue paper).  To get them on the ceiling, the first step is to measure out a grid so the squares are centered.  With that done, each square gets glued up one by one – until you get an entire gold ceiling!

The result was worth the effort and the client loved it!

Enjoy!

Jason

Ash leaf 2 BLOG.jpeg
Ash gold leaf 1 BLOG.jpeg

Dramatic Lime Paint Finish

I love collaborating with homeowners and designers on specialty finishes – and this recent project in Westwood, MA is no exception!

The dining room originally had white walls with white wainscotting on the lower half.  The client is a big fan of black/dark gray and white as a color scheme – so the designer wanted to work with that, but come up with something more dramatic and interesting.

To make this happen, we used lime paint – which is applied with a trowel like plaster, sealed with wax and then burnished – or shined- by rubbing it with the edge of the trowel.

Everyone (including me!) was thrilled with the results!! We got the richness of the varying colors of charcoal with the motion and variating shine from the specialty finish. It looked particularly good with the homeowner’s fantastic chandelier and vase.

Here are some pictures of the end result – including a close-up/angle shot to show the sheen resulting from the burnishing.

Enjoy!

Jason

Stacy Lime large wall BLOG.jpeg
Stacy Lime corner BLOG.jpeg
stacy lime close BLOG.jpeg

Real Gold Leaf and Real Rust make a Fireplace Special

I recently finished a job at a restaurant in Bellingham, MA where they had me doing specialty finishes to a space they are renovating as they prepare to re-open.

The room has an upscale rustic feel to it, so we finished the walls with Roman plaster – which gives a subtle texture to the walls, making them look and feel (!) beautiful.  Below is a detail shot of one of the walls.

Roman Plaster detail BLOG.jpeg

In the center of the room is this fantastic stone fireplace – but the semicircle detail over the top was a lackluster gray concrete.  The restaurant owner wanted this to pop and feel special – so we had fun using different materials to make this happen!

After prepping the surface, I painted it with an iron paint (literally, paint that has iron in it!), which gives a matte black look to the surface.  The next step was to apply real 22-carat gold leaf, giving it just a little bling!  The final touch to bring the look in line with the rustic room was applying a rust activator to the iron paint – creating these streaks of rust.

Coachman fireplace BLOG.jpeg
fireplace close-up BLOG.jpeg

It was a blast using real gold and real rust – and the client loved the result.

Enjoy!

Jason

Accent Murals for a Pop of Interest

While my murals often can be very detailed and/or take up entire walls (or even rooms) – sometimes my mural work can be used just as an accent!  A few recent projects – all working with the same designer – were exactly this type of accent mural used to give rooms a “pop” of interest.

The first example is in a nook that is set up as an arts and crafts table for the client’s children.  In a space that is largely done in black and white, touches of yellow (including the lucite chairs) were part of the inspiration for this mural.  To give the space interest and drama, while also adding a sense of fun (and of course a tie-in to the arts and crafts table!), the designer came up with the idea of making the wall look like the edge of a paint can – with a dramatic yellow dripping from the top of the wall. Working with the designer’s team, we plotted out just the right amount of “drip” to get the look just right!

Below is a shot of the final result:

paint drip BLOG.jpeg

The second example in in a room that is being used as a play space for the client’s children – so the goal was to do something bold and fun.  This room is immediately to the right as you enter the front door, so the designer also wanted to create something that would go with the clean, modern look of the rest of the house.  We settled on these sharp stripes that get framed by the doorway into the playroom and use colors that pop, but still complement the rest of the home’s décor:

needham stripes BLOG.jpeg

The last example is in a large, open entertainment space in the basement.  Again going for a fun but sophisticated look, the designer wanted a wide, curving shape made up of multiple stripes in grays and teals to go with the carpet and furniture in the room. To add intertest and accentuate the hand-done feel, we wanted to see the brush strokes and create a gradation of saturated to light from the top to the bottom of the stripe.  The result was just the right look the client was going for!:

worm mural BLOG.jpeg

Enjoy!

Jason

Reinventing a Space with Decorative Plaster

It was last December when I first met my client Michele and her designer Sara.  We were meeting to look at the large great room in Michele’s beautiful new home with the goal of reinventing the space.  The first order of business was figuring out what to do with the walls – which is where I came in, together with my business partner Joan.  The finish that Michele inherited was very heavily textured, with sharp peaks of plaster scattered throughout the space.  Over the texture was a faux finish of a dark brown and an even darker brown glaze.  Adding to the challenge, this same finish continued into the kitchen and 2 small hallways. The overall effect was very dark, heavy and dated looking.  Below are some before pictures that help paint the picture of where we were starting:

Fireplace wall before

Fireplace wall before

TV wall before

TV wall before

Small hallway before/ close up of texture

Small hallway before/ close up of texture

As we collaborated with Sara and Michele on possible solutions, they shared that their goal was a French chateau look that would work with the arched windows and doorframes, as well as other details in and outside of the house.  They did not want simple flat walls painted a single color, but they did want something cleaner, brighter and less overbearing.

To accomplish all of these goals, we suggested roman plaster.  We explained that we could scrape the walls to knock down the most extreme areas of texture, but use the plaster to hep even out the rest.  Roman plaster itself has a texture, but it is a subtle effect that gives some interest and motion to the walls without overwhelming the space.  Roman plaster is also finished with wax that can be burnished for nice variations in shine that accentuates the motion of the plaster and would fit perfectly with the French chateau look!

Michele and Sara were excited about the idea – so we were on to doing samples.  In doing the samples, one of our main points of focus was getting the color right.  We knew we wanted something lighter and brighter than the brown, and we needed something that would go well with taupe wallpaper in an adjacent space, the terracotta kitchen floor and the cream-colored cabinets.  To accomplish these objectives, we mixed different combinations of the standard plaster colors to look at in the space.  With sample boards in hand, we met again at Michele’s to look at the finish and our proposed colors.  This finish was a hit, and one of our colors was a perfect fit – so we were on to ordering materials and planning the job!

Once on-site and set up with scaffolding and ladders, we were on to scraping down the walls and priming them with a specialty product that helps insure a good bond for the plaster.  With these steps done, we then applied a base coat plaster – which is a grainy, almost concrete-like substance that helps level the texture of the walls and creates an ideal surface for the final plaster to adhere.

Then we were on the plaster and finally getting to see what the end result would be!  Once the paster dried, we sealed and burnished it with the wax to protect the finish and give it the final look.

The end result is beautiful!  Michele and Sara were both thrilled – as were Joan and I !  The room is now brighter and cleaner with a great color and the motion and texture of the plaster add the ideal level of interest and richness to the large space.


Below are some of the “after” shots showing this new finish…


Enjoy!

Jason

Fireplace wall after

Fireplace wall after

TV wall after

TV wall after

Farina feature BLOB.jpg
Close-up of final texture

Close-up of final texture

Farina short BLOG.jpeg

Look Up! Adding That Wow Factor with Decorative Ceilings

Working with interior designers, I have seen many fantastic ideas for making a space come alive – and a recent condo renovation in Brookline is no exception! 

Using a subdued palette of grays, taupe and white throughout, the designer was looking to add a bit of “jewelry” and decided to look up for her inspiration… to the ceilings!  In the master bedroom and dining room, she decided to add a bit of pop and sparkle to the ceilings that would make the rooms feel more elegant, interesting and special.

That was where we came in! Starting in the bedroom tray ceiling, we wanted something that felt upscale and added some sparkle while also feeling soft and hand-done.The designer and homeowner were thrilled with our solution – which was a linen-look finish painted with metallic pearl paint. To accomplish this look, we started with a taupe-painted base and did a special application in 2 directions of the metallic pearl glaze. Below are pictures of this:

The bedroom ceiling

The bedroom ceiling

Bedroom ceiling close-up/detail

Bedroom ceiling close-up/detail

But we weren’t done yet!  In addition to the master bedroom, there was another tray ceiling in the dining room that needed our attention.   For this room, the goal was a finish that was a bit more formal, but still had a hand-done feel to it – which we accomplished with imitation silver leaf.  Since leaf is actual metal (in super-thin square sheets), it creates a “real” metal look that can’t be replicated with paint.  Gluing the sheets also creates subtle variations in the metal and how it reflects – creating a surprising warmth and interest which adds just the right amount attention-grabbing soft glow.  Here are some shots of this treatment:

Looking up at the silver leaf ceiling

Looking up at the silver leaf ceiling

Capturing the “glow” of the leaf ceiling

Capturing the “glow” of the leaf ceiling

leaf ceiling side view web.jpg
Leaf ceiling detail

Leaf ceiling detail

In the end, the designer and homeowner were thrilled with the results, and we were thrilled to be part of adding that last special touch in our client’s new home.

 Enjoy!

Jason

Adding Seaside Character with Faux-Painted Driftwood beams.

When I am creating faux finishes, I sometimes am charged with making something decorative and beautiful – but sometimes I am charged with adding character with something that looks realistic.  My recent client near the ocean in Quincy fell into this second category – as they wanted simple white-painted beams in their sunroom transformed into character-filled salt air-bleached old wood beams.

This was music to my ears! I love incorporating my fine-art realism into my decorative painting projects, and replicating something like old wood is just a fun challenge. 

My first step was to meet with my clients to look at the space and the colors around it.  We talked about the colors of the walls, the colors of the fan blades and the colors of the cabinets in their adjacent kitchen to come up with a scheme for the beams.  We wanted them to have a grayed, driftwood quality to them – but we also needed a little warmth to keep the wood feeling realistic and also tie into the colors of the fan and the cabinets.

My next step was to create 4 different sample boards, using different color combinations to review together with my clients – each just subtle variations of gray driftwood and warmer barn-wood tones.  After meeting, we had a clear choice for the space – so I was on to painting the beams!

After creating the wood grain, I was on to my favorite part - creating knot holes, subtle cracks and stains and old nail holes to really make the beams look authentic.  While I was there, a carpenter who was working at the house saw what I was doing and thought I was applying a treatment to the wood – believing that they were old wood beams all along!

Most importantly, my client is thrilled with their newly old-looking beams!!

Below are pictures of this job - enjoy!

Jason

Before

Before

After

After

Before

Before

After

After

Before

Before

After

After

Before

Before

After

After

Commissioned Art for a Gift that will give Goosebumps!

One of my favorite things about commissioned painting projects is that I get to play a role in a special moment in my client’s life.  This was definitely the case with a recent project for my client Nick who was looking to commemorate an amazing trip and honor a family friend.

Nick was spending time with his friend Matt, who on a whim encouraged Nick to join him on a trip to visit his Uncle Ken in Montana.  Nick had never been to Montana, so he decided to join Matt’s adventure – following a portion of Lewis and Clark’s journey down the Missouri river.  The trip included more Matt’s extended family and friends – none of whom Nick had met previously, but all of whom he became close with on this trip! 

Two of the most memorable parts of this excursion for Nick were a particular stop along the river known as 'Eagle Creek' and Uncle Ken - a true 'Cowboy'.  The stop was a campsite across the Missouri river from the White Cliffs – captured beautifully at sunset by Nick with his camera.  Uncle Ken - or 'Cowboy Ken' as he is sometimes referred, is a sixth generation Montana native who knew the area like the back of his hand and ended up serving as their defacto guide. 

As he gets older, however, Ken is less capable of taking this trip – and as it turns out, this particular outing with Nick was one of Ken's last journey down the Missouri.

To commemorate his trip and honor Ken, Nick wanted to have his photo turned into an unforgettable gift – which is when he reached out to me to create an 18” x30” painting he will be giving to Ken and his family as a Christmas present

I loved doing this project – largely due to my own love of canoeing and camping, but also because I loved Nick’s photo (below).

Nick’s photo

Nick’s photo

In turning this into a painting, I wanted to keep the mood and the lighting of the sunset – but I also wanted to lighten it up significantly to highlight the cliffs and prevent the painting from being too heavy and gloomy.  Another change I made was to add a bit more of the river, since that was so integral to the trip.

We are waiting on the painting to arrive in Montana to learn of Uncle Ken’s reaction – but Nick was thrilled with the painting! His reaction was one of my favorites – as he said it gave him “goosebumps”…. Mission accomplished!

Below is the final painting — Enjoy!

Jason

The final 18”x30” painting

The final 18”x30” painting

Faux Painting for Restaurant Ambiance

The goal of each decorative painting job can be a little different.  Sometimes I am using faux finishes to make something subtle, other times bold. Sometimes I am making a beautiful finish, other times the objective is to make a statement.  In the case of a recent job at a pizzeria bar in Attleboro, I was definitely shooting for the “bold” and “statement” side of things!

When doing a specialty paint finish for restaurants, I find that it is similar to painting a set for a play or movie.  The look needs to set a stage, so to speak, for the mood of the restaurant.  For this restaurant, the owner wanted an “old world” look for the bar that would be consistent with his recent renovations on the exterior – so working with a designer and a fellow decorative painter, we came up with a finish that resembles aged, cracked plaster.

The restaurant owner was on board – so we were on to creating the finish!  As is often the case with faux finishes, the key to creating depth is layering different colors and different materials.  Starting with four different darker, warm colors we created the under layer that has a mottled look.  Then, to make the plaster look more authentic, we used a plaster-based paint that we applied with trowels, strategically leaving “cracks” to expose the base layer.  The other plus to this approach that you can’t see in the photos is a texture that adds to the authenticity of the

The end result gave the owner the look he was going for – and won a big thumbs up from the bar tenders and wait staff as well!

Enjoy!

Jason

Briggs key wall BLOG.jpeg
Briggs wall 2 BLOG.jpg
Briggs wall 3 BLOG.jpg

Commissioned Paintings on Saws

And now for something completely different… commissioned paintings on saws!

My client Nancy had 3 large saw blades (6’ long, 4’ long and 3’ long) and wanted to have them painted with “special memories” to be used as decorations in their NH home.   Nancy’s father owned a wilderness canoe camp for boys in the early 70’s, and this was the perfect subject to make these pieces something the entire family would cherish.

Using old brochures as inspiration, Nancy came up with the general themes she wanted on each saw.  The old pictures in the brochures gave me some visuals to work with, but putting them together in such long, narrow formats took some creativity – although it also helps that I am an avid canoeist and camper!

As always, I started by doing scale sketches of each saw design for Nancy to review.  I was careful to use period-correct aluminum canoes, as well as other little touches like the styles of life preservers, paddles, tents and even hair styles.  With some collaboration and tweaks, we had approved designs ready for me to paint!  Below are the sketches:

Sketch for 6’ saw

Sketch for 6’ saw

Sketch for 4’ saw

Sketch for 4’ saw

Sketch for 3’ saw

Sketch for 3’ saw

First, I prepped the saws with a self-etching primer to make sure no rust would come back and pop up through my paint.  Then I was on to transferring my drawings to the saws and stating to paint!  When painting, I wanted to make sure the colors went together as if they are a series, but were still different enough to be appropriate for different settings and different times of day.  I also focused on using color to help create some depth to counter the flattening effect of the long, narrow shape.

Nancy was thrilled with the end result and can’t to get them on the wall and share them with her family!  Here are the final saws:

Enjoy!

6 foot saw

6 foot saw

4 foot saw

4 foot saw

3 foot saw

3 foot saw

The entire collection!

The entire collection!